No Products in the Cart
You're probably asking yourself, "How do I install a dash cam?" While you might pay someone to install a dashcam, if you are a professional DIY lover, doing it yourself is a smarter option that will save you money and provide a better understanding of the device. There are several dash cams install methods distinguish from different place get power, ranging from easy to intermediate. We will take you through each method below.
WARNING: these types of installation should be performed by a qualified individual or business only. Working with your vehicle's power system can be dangerous to both you and your vehicle if you do not know what you are doing! If you have any doubts, please consult a professional.
The installation of dash cam can be understood in simple terms, inserting the SD card, slapping the camera on the windshield, and plugging it into a power source. Here show you 4 methods to connect the power source.
Method 1 Get Power from a Cigarette Lighting Adapter (CLA)
Cigarette lighter is a standard configuration for each vehicle. Generally, more than 2 cigarette lighters will be configured. Though you may not smoke, the cigarette lighter socket in your vehicle is more useful than you think. Just by connecting your cigarette lighter adapter power cable to your dash cam and into your vehicle, you can have your witness running in under 5 minutes.
Installation in Six Steps:
The cigarette lighter is simple and convenient to get the power supply, perhaps the most difficult thing for riders is the wiring problem. Find out the hardwiring path, and hide the wire along with the headliner. Roof location wiring is easy, just plug the wire directly into the gap between the roof trim and the glass, and use a trim tool to assist in plugging the wires to make the wiring more perfect.
1.Install and fix your dash cam on the rearview mirror.
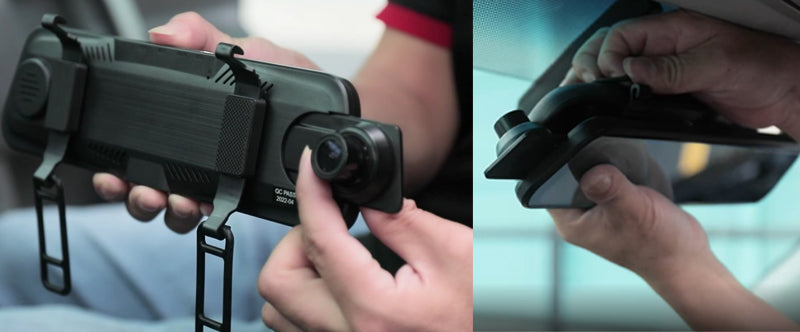
2.Use a pry tool to pry open the housing on the side of the copilot.
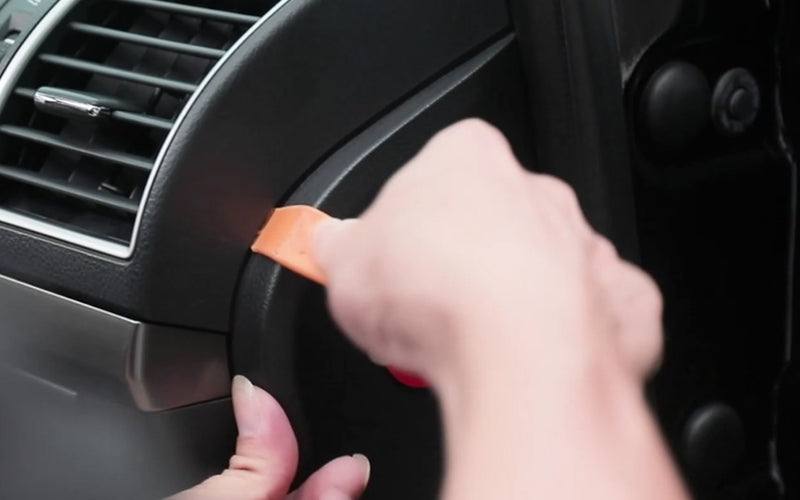
3.Take out the power cord from the package accessory bag.
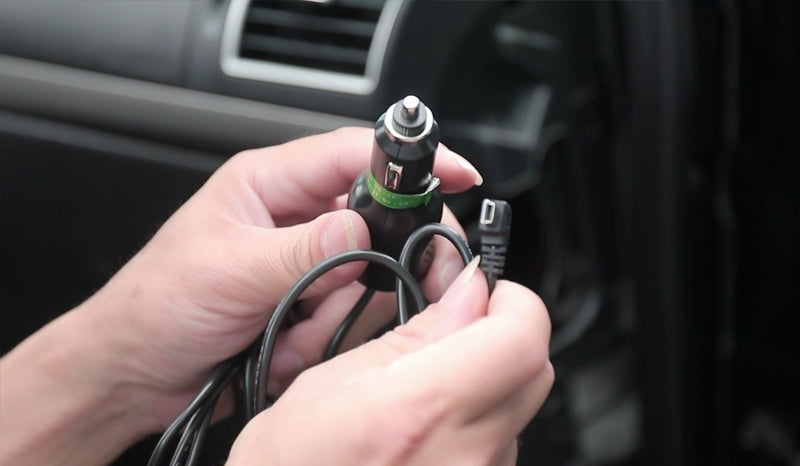
4.Open the side base plate.
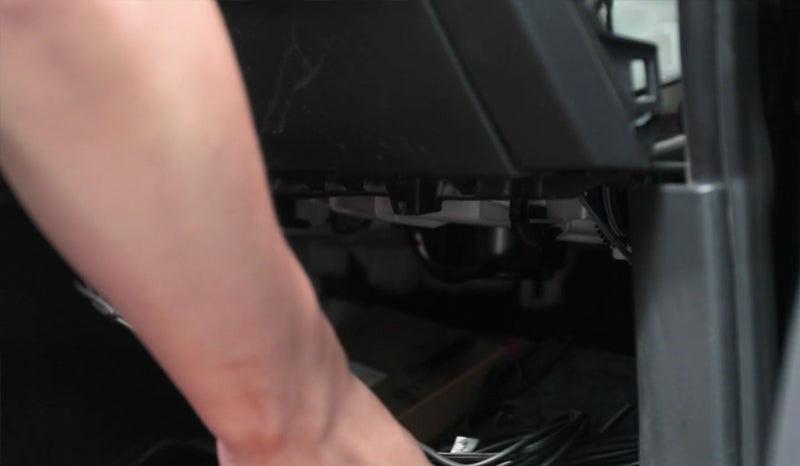
5.Our power cord will pass through the side of the copilot.
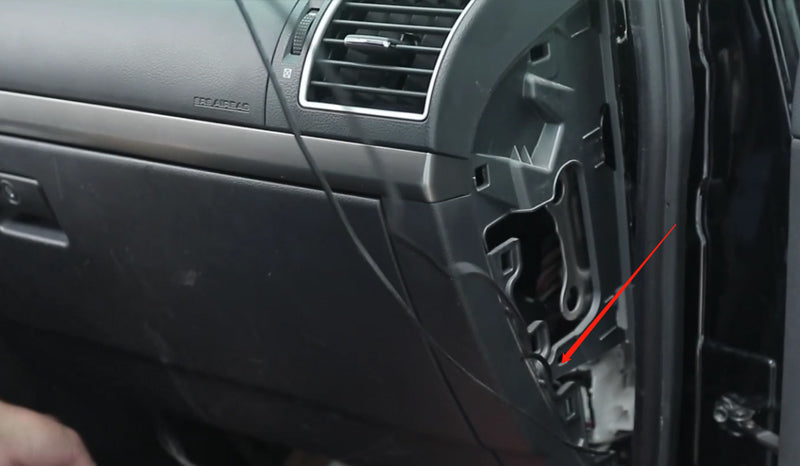
6.Insert the power cord into the recorded power connector,the rear view camera cable is also connected.
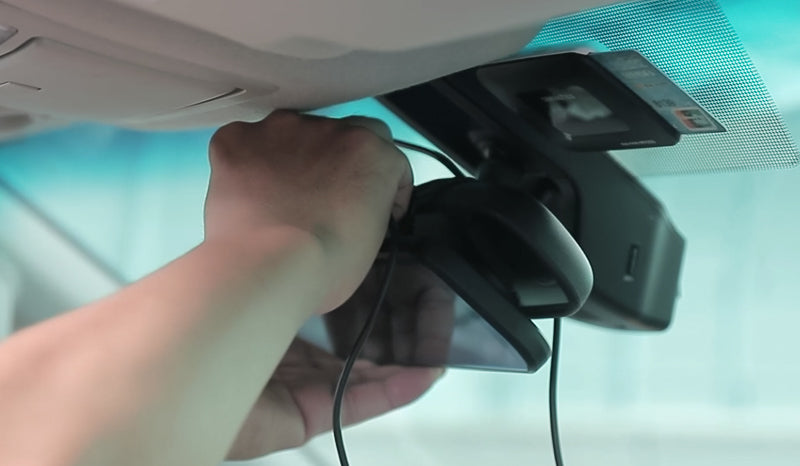
7. Use a crowbar to hide the connecting wire above the windshield.
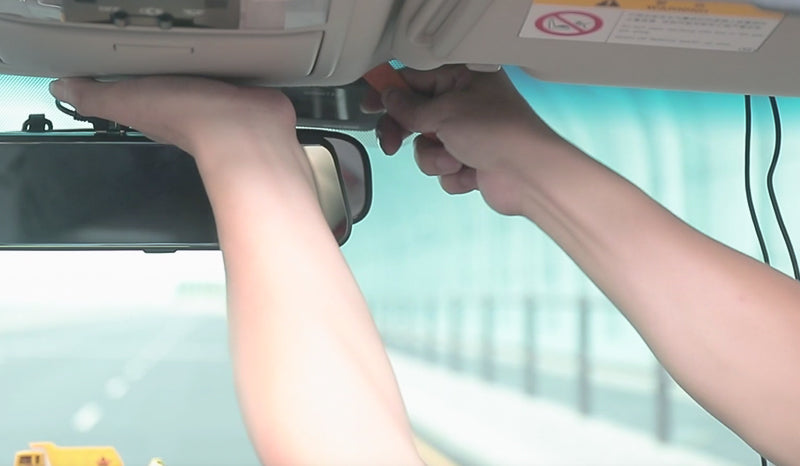
8.Hide the wire between rubber to A pillar. Then hide the wire between A pillar to B pillar.
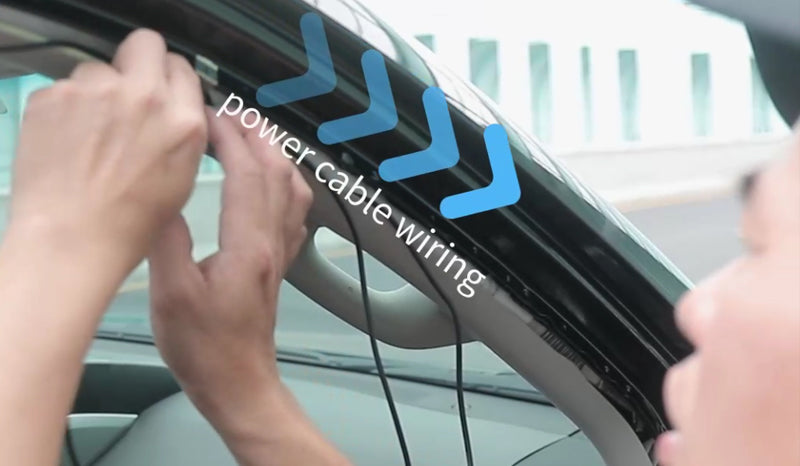
9.Hide rest of the wire underneath the carpet.
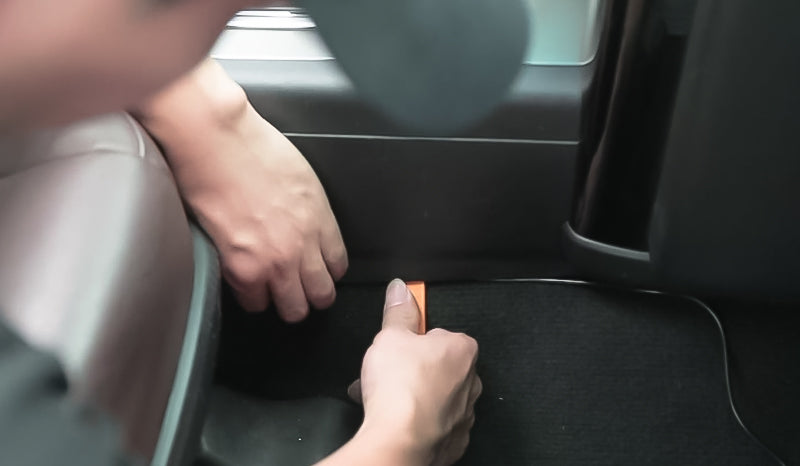
10.Plug into the cigarette power socket.
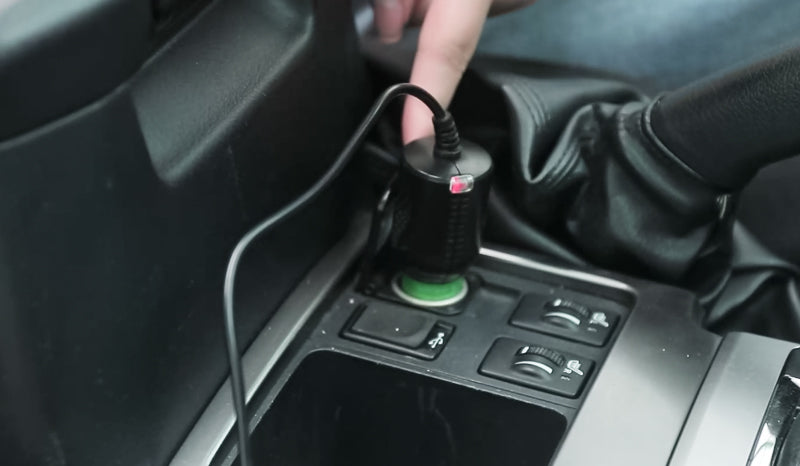
The advantages get power from a CLA:
Simple equipment, plug and play, no installation difficulty, and all kinds of equipment are supported.
The disadvantages of get power from a CLA:
While this is the simplest way to plug-and-play the power cable for your dash cam installation, you may miss out on important dash cam protection features such as parking mode. Because the 12V/cigarette sockets in most vehicles are ignition-switched, after parking and turning off the vehicle, the car battery will stop supplying power, and the driving recorder will be powered off, so the parking monitoring function of the dash cam is invalid. Moreover, taking electricity from the cigarette lighter will occupy the vehicle charging, causing inconvenience to other electrical equipment.
There are also a few brands of vehicles that may have sockets that are always on, Ford, Chrysler, and Chevrolet, for example, even when the vehicle is switched off. If this is the case for you, you may think that you won't need to hardwire your dash cam to take advantage of parking mode. While this may work in some specific cases, we would generally recommend against this due to two main issues:
Issue #1:
No Voltage Detection or Turn-off
Except for some high-end cars that have an automatic power-off function, most models do not have this function. Note that the parking and flameout mentioned here means that after the key is removed and the power is completely turned off, the cigarette lighter continues to work. That is, when you sleep at night, the electrical appliances plugged into the cigarette lighter in the car are all working.
Many always-on cigarette sockets are not sophisticated enough to detect the voltage and turn itself off should the car's battery drop too low. With most passenger vehicles, a 2-channel dash cam can drain a vehicle's battery down from 12.6V to 12.0V in 12 hours or less. When the vehicle's battery drops below 12.0V, it may have issues or hesitation upon start up and causes extensive wear and tear on the battery due to deep-cycling.
This means that on most vehicles, if they're parked overnight, the battery can drain to a point that is hard on the car and battery, and make it impossible to start the car again; the second is that affects the service life of your on-board equipment and the battery of the car; the most serious result is that the electrical appliances work for a long time and cause spontaneous combustion.
Therefore, drivers who use the cigarette lighter to obtain electricity should pay attention to whether your vehicle is not powered off after stopping the vehicle. If you stop the car and turn off the power, you need to unplug the power supply of your car equipment from the cigarette lighter every time you get off the car to avoid invisible consumption. Because of this small detail, it is too headache to ignite the car when you use it.
After parking, unplug the cigarette lighter in time!
Issue #2:
No Ignition-Switched Power Feed
If you were to cut open a dash cam's cigarette power adapter, it would have two wires inside, a positive and a negative. Because of this, the camera only knows whether it's receiving power or not and can't distinguish from when the car is switched off.
Videos get overwritten a lot more quickly as they aren't only triggered when motion or impacts are detected.
Power consumption in continuous mode is typically a fair bit higher than in parking mode
The G-sensor sensitivity in parking mode will be a lot more sensitive as the car should not be in motion. This is important for picking up light bumps like door dings or parking impacts.
If the car is switched off and the cigarette socket stays on, the camera will still assume the car is running. In contrast, cameras that use direct hardwire kits have cables with three wires so the camera can be powered while the car is off but also lets the camera know when the engine switches on and off. This is required to activate parking mode on many parking mode-capable dash cams, otherwise they can only record in continuous mode.
Generally speaking, the power supply of cigarette lighter is common and convenient. It should be the use mode of most of our on-board equipment, but it is not the best way, because the perfect way is to fully integrate into the car interior, and there are no messy wires.
The full name of OBD is On Board Diagnostics, which means on-board automatic diagnostic system, and the OBD interface is usually an integrated interface connected to the on-board diagnostic system, which is generally used to monitor the working conditions of the engine electronic control system and other functional modules of the vehicle.
Drivers who go to repair their cars in trouble should have seen that the repairmen take a tablet and connect it to the OBD interface to check the fault code. In fact, the OBD interface can also get electricity, and the OBD interface of most models is equipped with constant electricity, which can still provide power after cut out.
The introduction of the OBD cable is great news for drivers who are looking for a simpler alternative to the traditional hardwire method. An OBD cable only needs to connect to the vehicle’s OBD port, your dash cam will be able to receive a parking mode recording for your dash cam video (if your dash cam has this function ).
Installation in three Steps:
1. Find Your OBD Interface
All vehicles manufactured since the mid-1990s will have an OBD port, making your dash cam installation nice and easy for plug-and-play. The OBD interface in a vehicle is typically located to the left of the steering wheel and underneath the dashboard, it is convenient to hide the wiring. There may be a latch or cover that you need to remove/lift in order to access the port. The connection method is also relatively simple, just buy the matching OBD power supply cable and plug it into the OBD port.
2. Wiring your dash cam
Mount your dash cam against the window and make sure it's in the right spot. Hide the leftover wires into any panels, gaps, up the A-pillar and through the headlining of the vehicle with your trim tool.
3. Connect your OBD Cable
Finally, plug your dash cam into the OBD port, turn on your vehicle's ignition and power on your dash cam to see if it works properly. And if it does, then you have successfully installed your dash cam.
The advantages get power from an OBD Cable:
Concealed wiring, modular interface, easy to install and not easy to make mistakes, with cutoff power supply, and your dash cam can parking-mode recording.
The disadvantages of get power from an OBD Cable:
The OBD power supply capacity is weak, and the set current limit is small. If the external equipment is overloaded, it is easy to overload and burn the insurance or the risk of the vehicle breaking down. For some models, the OBD power supply is in the same way as the trip computer. If the insurance is burned, the vehicle will not be able to start up. But in most cases there is no problem. The driving recorder also occupies the OBD interface (some OBD modules can realize functions such as parking and automatically raising the window), and it is often troublesome to plug and unplug if the OBD is used a lot.
The way to get power from the fuse box is a relatively safe and reliable way, but it is usually more complicated to install it yourself, because there are many insurance interfaces in the fuse box, it is more troublesome to understand the definition of each insurance, and people may don’t know how to use it, use which specification, and use what kind of step-down line,if there is no certain experience and it is easy to make mistakes.
However, the function is the most perfect. It is equipped with appropriate step-down line. The normal power supply and driving power supply can be switched for power supply. The functions of driving video and parking monitoring can be realized, and the concealed wiring does not damage the beauty. The fuse box terminal has different fusing current according to different functions. The location of high current insurance will not affect the function of the original vehicle.
Installation in Five Steps:
1.Find Your Fuse box
The Fuse box place is depending on the model of your vehicle, it is usually in the left cover or storage box of the steering wheel of most vehicles. On some cars, these boxes will open simply by lifting a tab or pulling a panel with your fingers, some cars you may need to remove some trim or open some panels to gain access to the fuses. while other vehicles may require prying with a trim tool.
2.Which Fuse Slot Should I Use?
The second thing to do is to understand which fuse slot to use. We always recommend selecting fuse slots that are rated between 10A-30A (in order to properly provide enough power to your dash cam). If you don't have relevant knowledge about power taking of fuse box, you need to read carefully to the definition of each port in the manual to avoid fuse slots that could pertain to certain safety features within your vehicle. For example, avoid fuses that deal with airbags, the horn, stability control programs, cigarette lighters, etc. Fuses that control certain elements such as the radio, garage door opener, sunroof, etc. are usually safe to use.
For almost all hard wire kits, there are 3 wires that need to be connected: a wire that goes to a constant fuse, a wire that goes to an ignition-switched fuse and another wire that goes to a metal ground bolt. A constant fuse remains on (and thus continues to provide power) even when the vehicle is off, an ignition-switched fuse turns off when the vehicle is off and a ground metal bolt prevents electric shock. You may also come across some hardwiring kits with only 2 wires that include either a constant or ignition-switched wire and always a ground wire.
Next, pay attention to the difference between get power from ACC and VCC.
The red line is ACC, and the power supply mode is power supply after ignition, which is power supply for normal driving video.
The yellow line is the constant power of VCC. It still has power after parking and flameout to supply power for parking monitoring.
The on-off of the two will affect the working mode of the dash cam, so it must cannot be reversed. You can test and confirm with a multimeter or equivalent to test which fuse is constant and which is ignition-switched before connecting. It can be judged after switching ignition and flameout for several times.
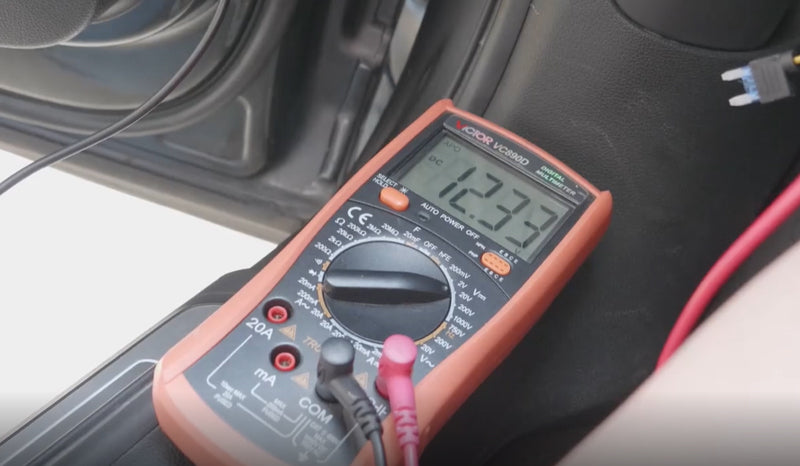
3.Ground the Hardwire Kit
The step-down line has a total of three ports. In addition to the connection of the corresponding color, you need to connect the black GND line. Your last wire (in the shape of a ring or a C) will go to the metal ground bolt. It's best to read the labels carefully prior to proceeding.
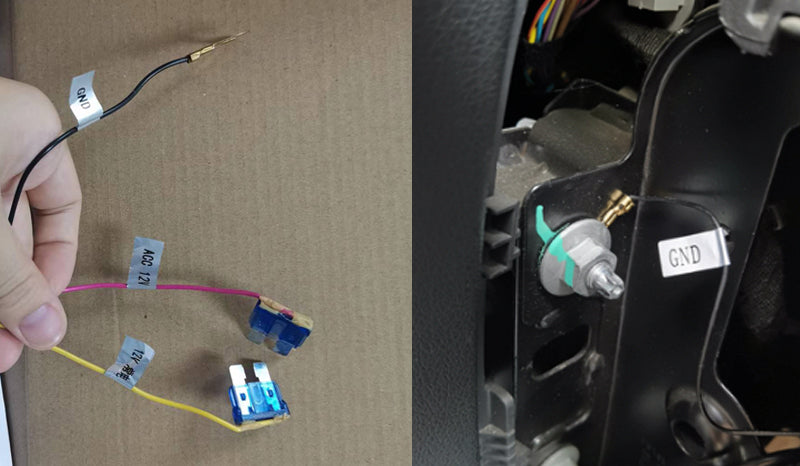
You will typically need a socket wrench set to loosen the nut or bolt that you choose to ground with. The most common sizes in our experience are 10mm and 12mm, although some German vehicles may require a Torx (6-pointed star) bolts. To attach the grounding terminal, loosen the nut or bolt enough to slip it in and tighten it back up afterwards. A loose ground can result in power issues for your dash cam.
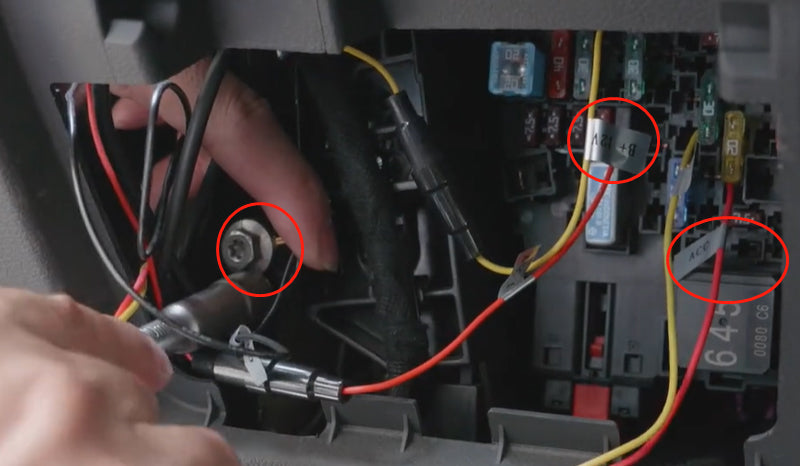
It's best to ground with a bolt on unpainted bare metal. If a bad ground is chosen, it may cause your dash cam to restart when the current is unable to flow consistently. Even if the bolt is metal - if the grounding terminal of the hardwire kit is fastened onto a plastic surface, you may come across issues. If you can find a factory ground, this is an ideal grounding spot for your hardwire kit.
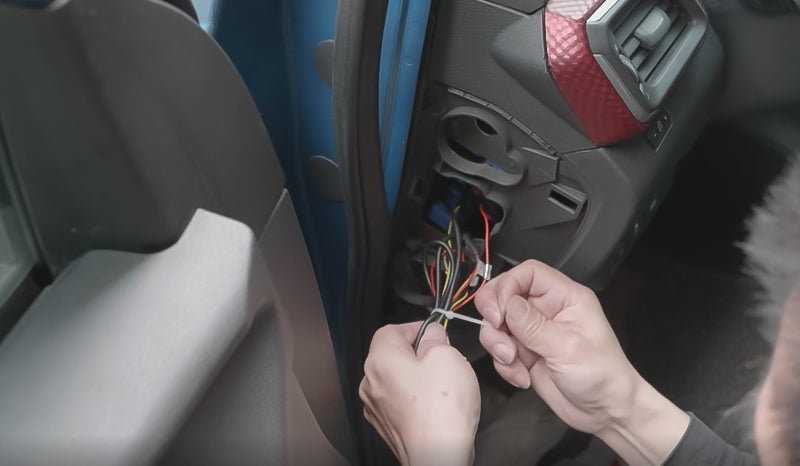
4.Clean up the wires
Next, clean up the wires, pay attention to fix the excess wires to avoid abnormal noise during driving, and avoid other cables to in case of mutual influence.
5. Test the Dash Cam
Insert your key in the ignition and turn it to the run position. If everything was installed correctly, you should see your dashcam turn on and begin recording! Perfect. You would then put the fuse back into the fuse slot.
The advantages get power from the fusebox:
Concealed wiring, does not affect the function of the original car, does not occupy the interface, both constant power and driving power supply, support driving record and parking monitoring, support high-power equipment.
The disadvantages of get power from the fusebox:
The fuse box is complex and requires some installation experience. The wrong interface will affect the function of some device, and a special step-down line matching with the recorder is required. The risk of taking electricity from the fuse box is that the battery will be used all the time during the parking monitoring operation, and the battery will not be replenished, which will easily cause the battery to lose power and the vehicle cannot be started.
The driving recorder is equipped with a low-voltage automatic shutdown function when the fuse box is powered. The voltage value can be set by yourself. When the voltage is lower than the set voltage, it will automatically shut down and stop recording. There is basically no risk of losing power and unable to start.
After parking, switch to constant power supply, some driving recorders can automatically open the parking monitoring mode, and use the interval time-lapse photography mode to reduce energy consumption and video footprint. Use the fuse box to get electricity to increase the parking monitoring, abnormal alarm and remote monitoring functions.
Generally speaking, using a step-down line to take power from the fuse box is the most perfect way.
An external dash cam battery pack can independently power your dash cam and provide a separate power source from your car's battery. The main reason why someone would want to use a power bank is that battery packs can do many things, such as: providing greater recording duration, eliminating wear-and-tear on the vehicle’s battery, and allowing a simple connection to just the vehicle’s 12V cigarette socket with a cigarette lighter adapter (CLA) and still achieving parking-mode recording.
Installation in 2 methods:
Method (1): Power Input Hardwire Cable
The traditional method of hardwiring involves connecting a hardwiring kit to the vehicle's fusebox. You can hardwire the battery bank into your car with the included hardwire kit. This is actually pretty easy, as all you’re doing is plugging a couple of wires into your fuse box and attaching a grounding wire to a metal screw.
Method (2): Cigarette Socket
For cigarette socket installation, you can insert the included 12V cigarette adapter into your vehicle’s cigarette socket. Ensure that your vehicle’s cigarette socket does turn off when the vehicle is off, otherwise the battery pack will continue to draw power until your vehicle’s battery is dead (as there is no voltage cutoff protection).
Ensure that you have the battery set to the “LOW” input selection so as to not blow the cigarette socket fuse due to high power draw. A full charge from empty will take about 90 minutes.
Both install options will allow the battery pack to be self sufficient and automatically recharge itself when your car is running.
The advantages get power from a Battery Pack:
Long battery life, give you the maximum recording time. And it will not impact on your vehicle battery as the Dash Cam Battery Pack will only charge when your vehicle is running.
The disadvantages of get power from a Battery Pack:
Expensive.
To purchase Mercylion brand products, please install them correctly according to the instructions of the manual, or consult our technical service email: info@mercylion.com. We're here to help.
Disclaimer
The Mercylion does not make any representations, warranties, or guarantees, express or implied, as to the accuracy or completeness of these installation instructions. Users must be aware that updates and amendments will be made from time to time to these installation instructions. It is the user's responsibility to determine whether there have been any such updates or amendments. Neither Mercylion nor any of its directors, officers, employees, or agents shall be liable in contract, tort, or in any other manner whatsoever to any person for any loss, damage, injury, liability, cost, or expense of any nature, including without limitation incidental, special, direct or consequential damages arising out of or in connection with the use of these installation instructions.
Someone purchsed a