No Products in the Cart

 German
 French
 Italian

Choose a dash camera specifically designed for motorcycles. It should be weatherproof, durable, and able to withstand vibrations. If Motorcycle riders are looking forward to a proof water, high definition, wide angle conversion, 2 channel recording function dashcam, the Mercylion M3500 Motorcycle Dashcam totally fits these guys ideotype. It's more helpful to the motorcycle users when riding a motorcycle on the road. Here shows the specific explanation step by step instructions clean install motorcycle dash cam front and rear on CFMOTOT Motorcycle for your reference.
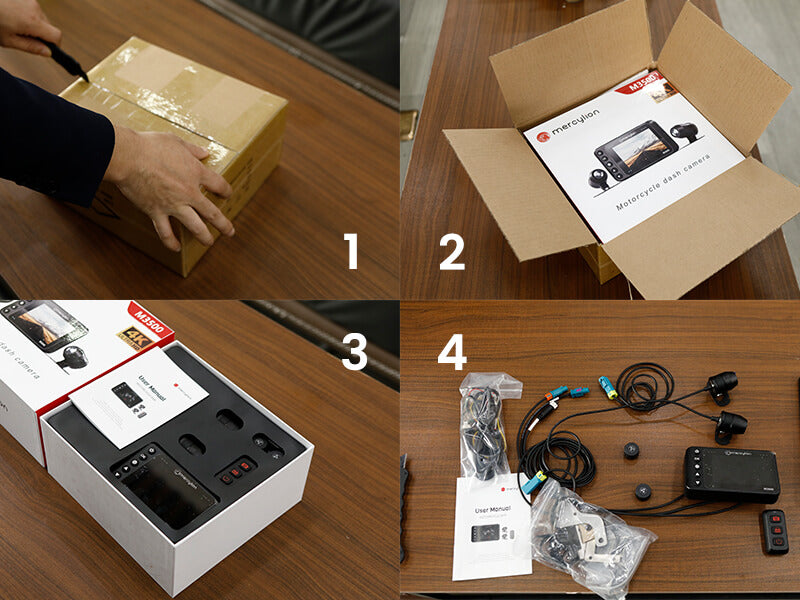
The standard boxing contain:M3500 Monitor, motorcycle dash cam 4K Front Camera,1080P Rear Camera, Front Camera Cable, Rear Camera Cable, Bluetooth remote control, Power cable, 32G TF Card, Bracket, Bracket Pad, Tire pressure sensor, Stainless steel remote control bracket, Host Bracket, Silicone pad, Screwdriver, Hex wrench, Strap, Cable ties. All in one, and it is convinient for you to install.

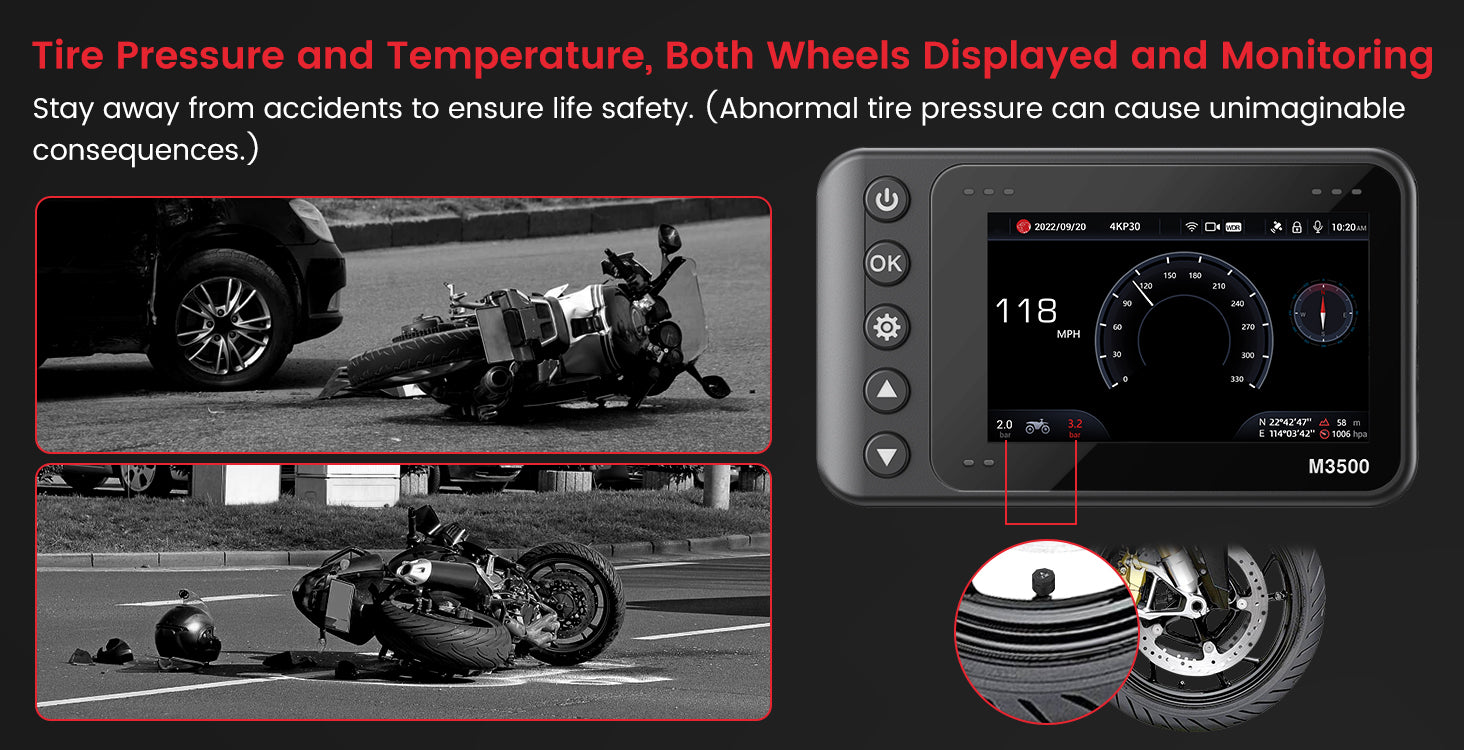
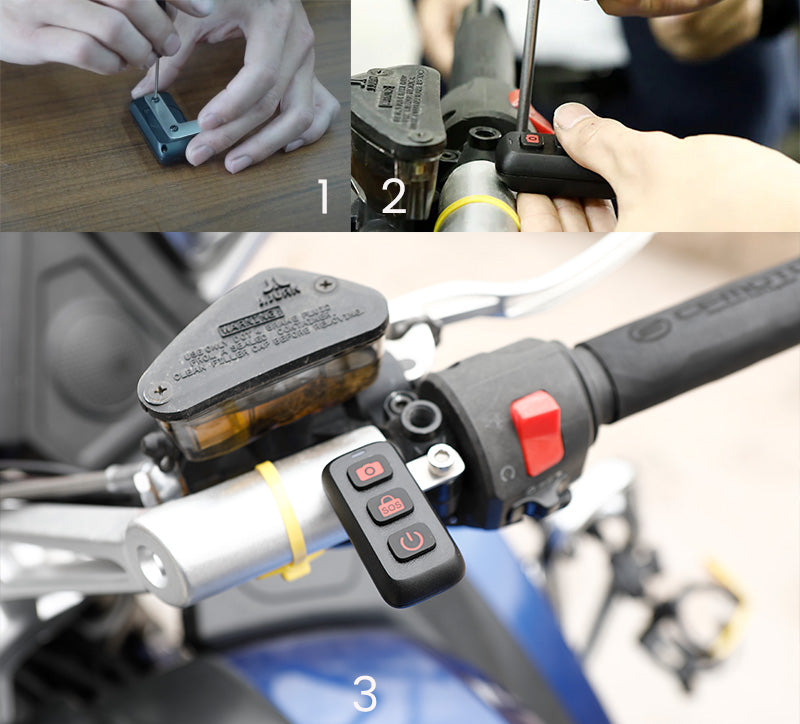
Mercylion M3500 support the tire pressure detection function. Installing a tire pressure sensor on a motorcycle can enhance safety by providing real-time monitoring of tire pressure, helping to prevent accidents caused by underinflated tires. Here's a general overview of how to install a tire pressure sensor on a motorcycle:
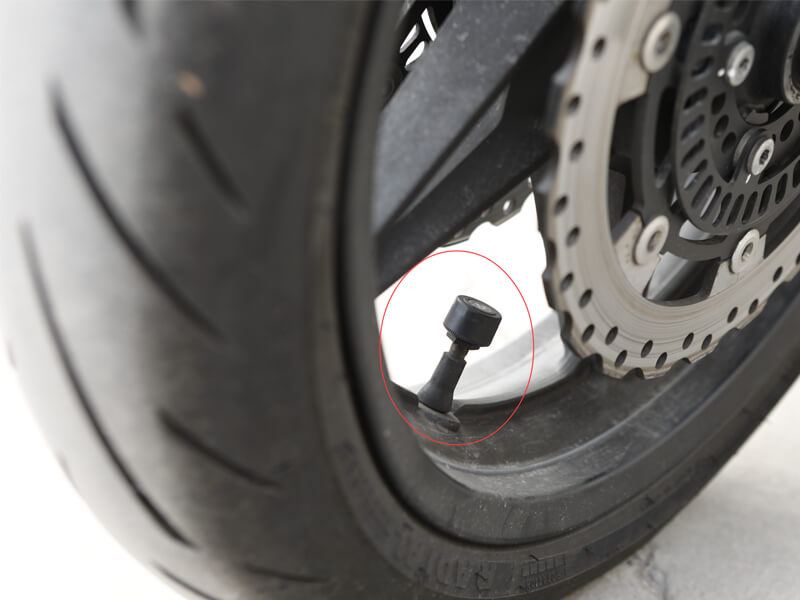
Locate Valve Stems: Identify the valve stems on your motorcycle's wheels where the sensors will be installed. Take out the two tire pressure sensors in the packaging box,each sensor will replace the existing valve cap.
Remove Valve Caps: Unscrew the valve caps from the valve stems on each wheel of the motorcycle.
Install Sensors: Attach the tire pressure sensors to the valve stems by screwing them on securely.
Warm reminder:Picture shows the location of the two wheel valve caps.
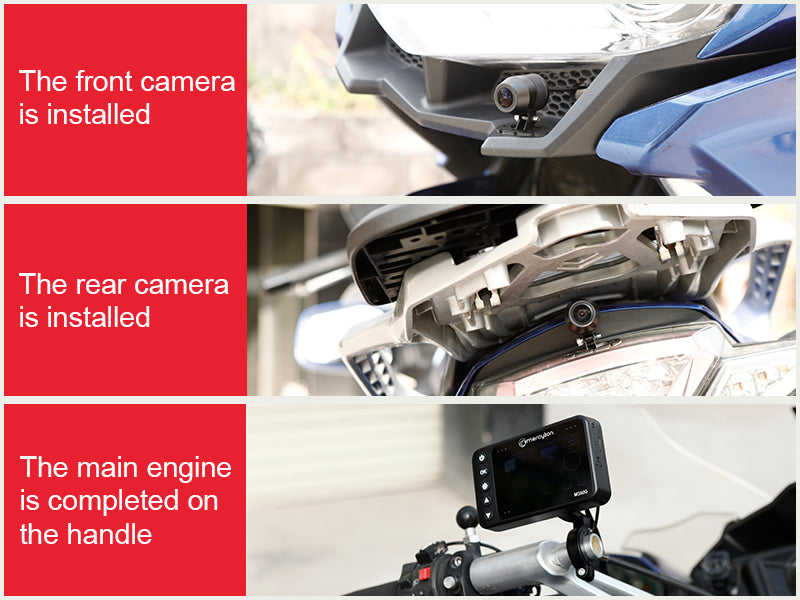
Mounting a motorbike dash cam, both front and rear, involves careful consideration of placement for optimal recording without obstructing your view or interfering with the motorbike's operation. Here's a step-by-step guide on how to mount a dash cam on both the front and rear of your motorbike:
Front Dash Cam Installation:
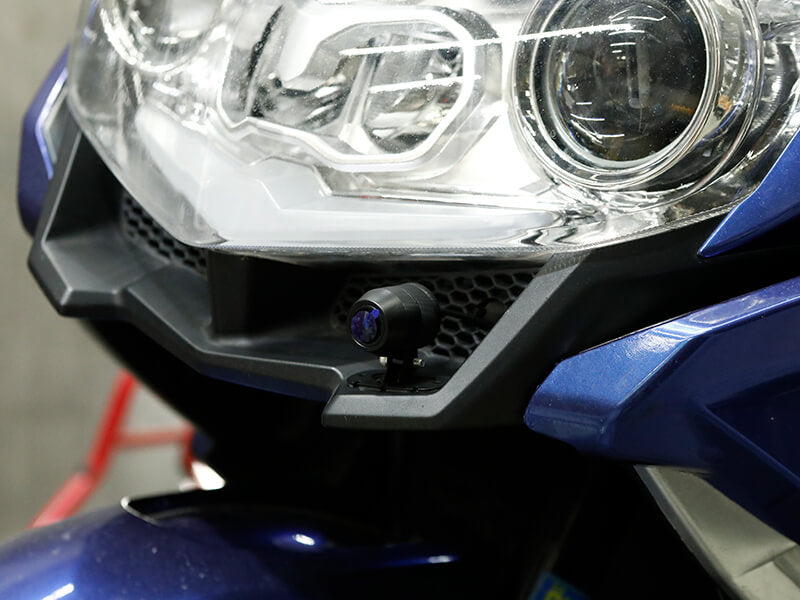
Choose the Right Location: Select a spot on the front of your motorcycle where the dash cam will have an unobstructed view of the road ahead. Common locations include the front fairing.
Prepare the Mounting Surface: Clean the chosen mounting area thoroughly to ensure proper adhesion. Remove any dirt, dust, or grease that could interfere with the mounting process.
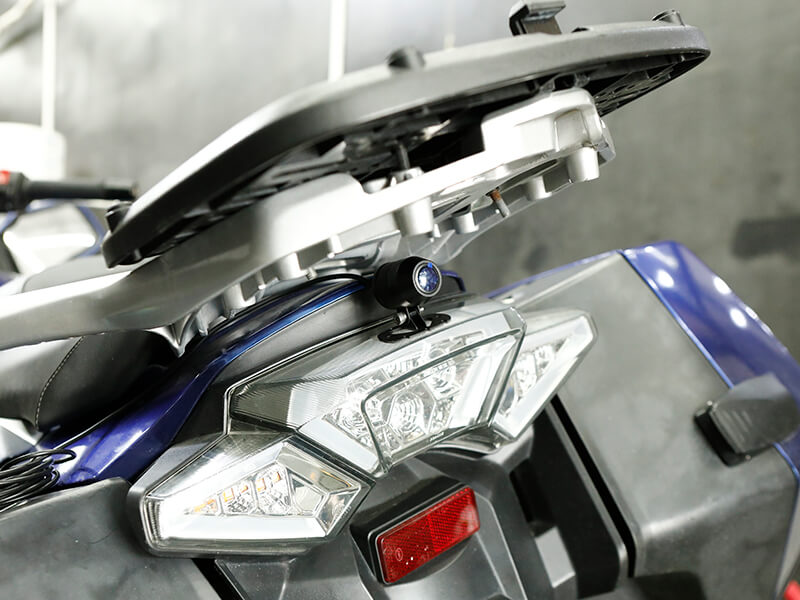
Attach the Mounting Bracket:The front camera bracket comes with 3M double-sided tape, tearing off the 3M adhesive. Use the provided mounting bracket to securely attach the dash cam to the chosen location. Like the picture below. Ensure the bracket is stable and won't loosen or move during riding.
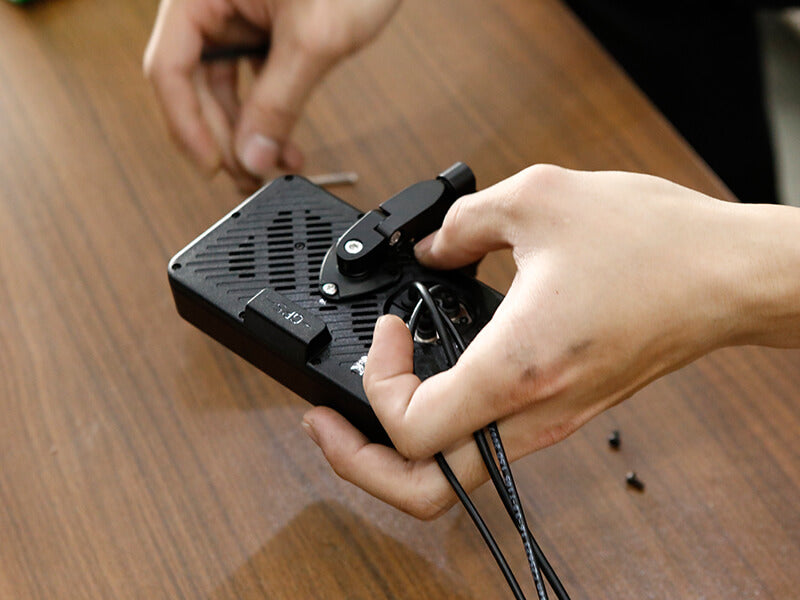
Install the Triangle Bracket to the Display Unit
First, take out the bracket from the standard boxing.The braket is Triangle shape, need to fix with 3 screws, which add the steady function of the dashcam mount. Fasten the bracket in the middle of the appropriate location, then use a hex wrench to tighten the bracket. Then take out the Mercylion motorcycle M3500 display unit, flip it to the back of the screen side, and install the bracket to the corresponding, screw hole position on the monitor.
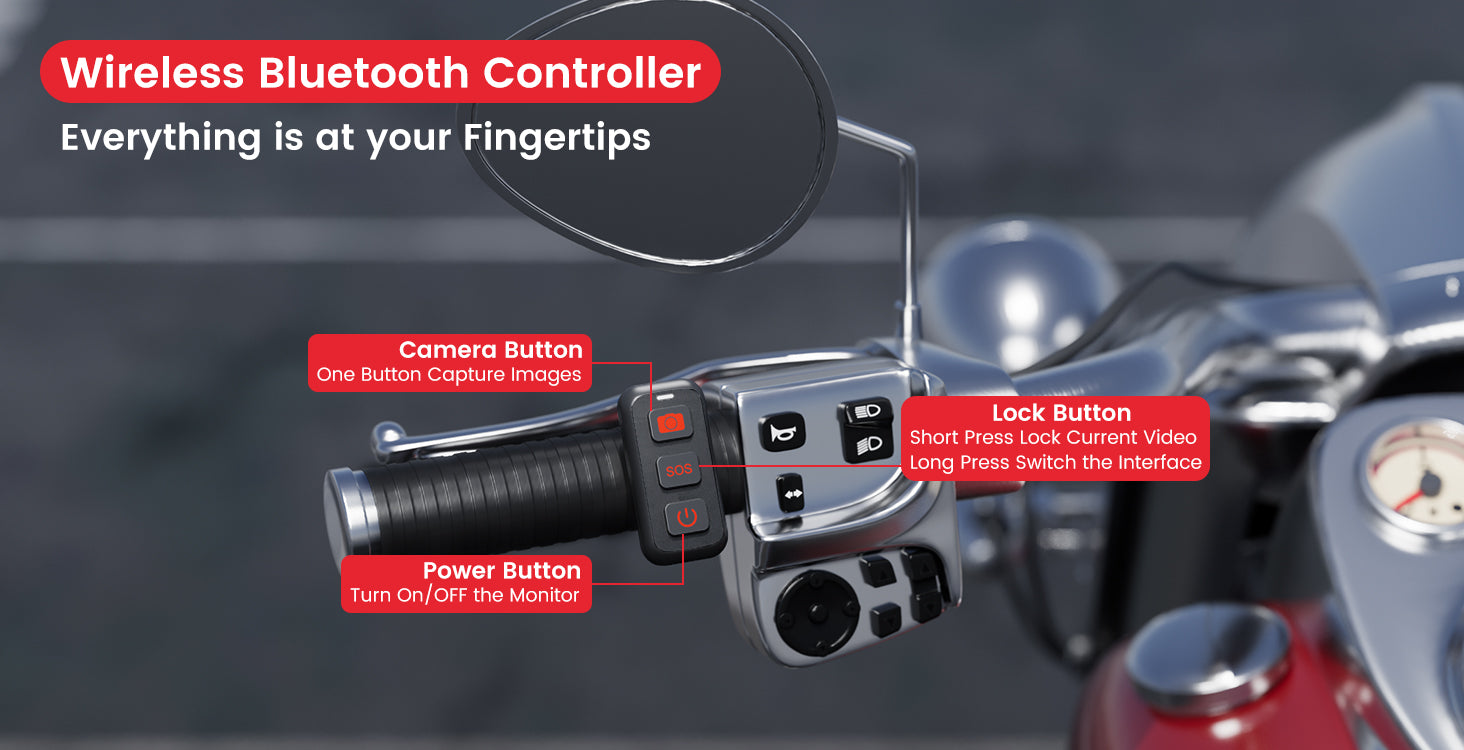
Mercylion M3500 provide the wireless remote control function, it typically serves various functions.
1. Press the power button to turn on or off the screen sleep and wake up monitor).
2.SOS key (Lock key for video file) In the recording state, short press lock, lock the current.
video, and long press to enter and exit the speed interface
3. Press the camera button to capture the current images of the front and rear cameras.
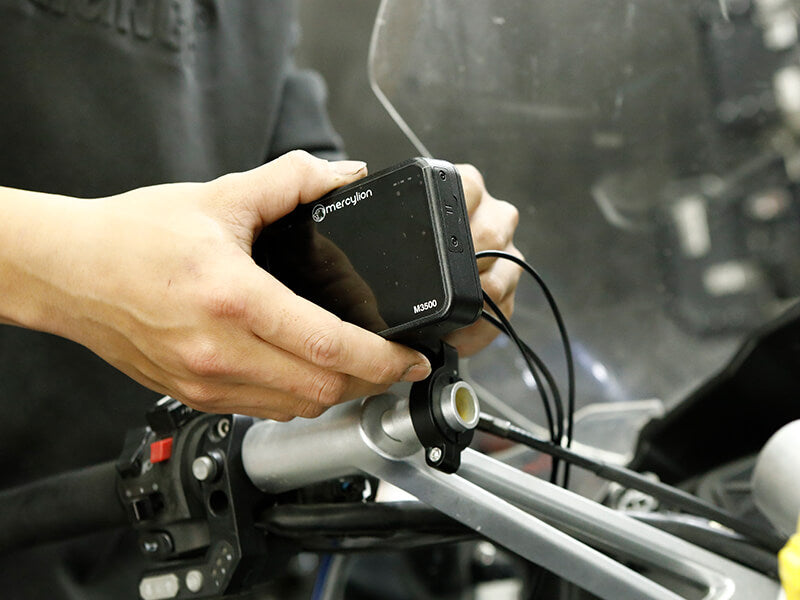
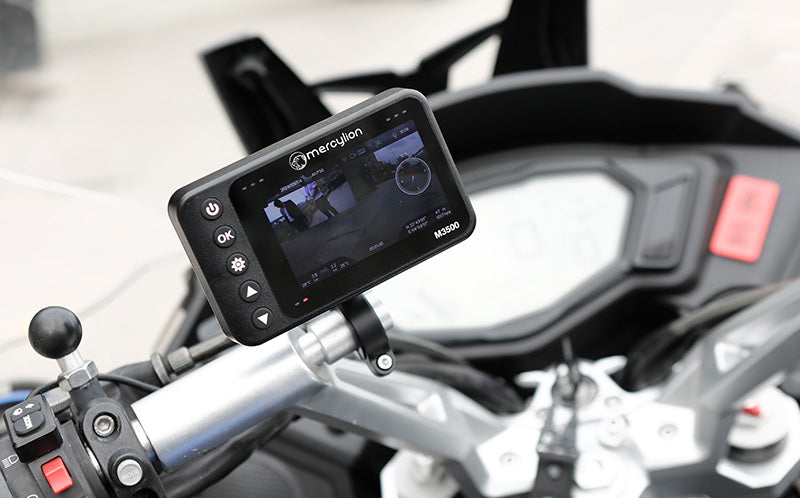
Choose the remote control mounting Location: Select a spot on your motorcycle's handlebars where the wireless remote control can be easily reached with your thumb or fingers while riding. It should be within comfortable reach and not obstructed by other controls or accessories.
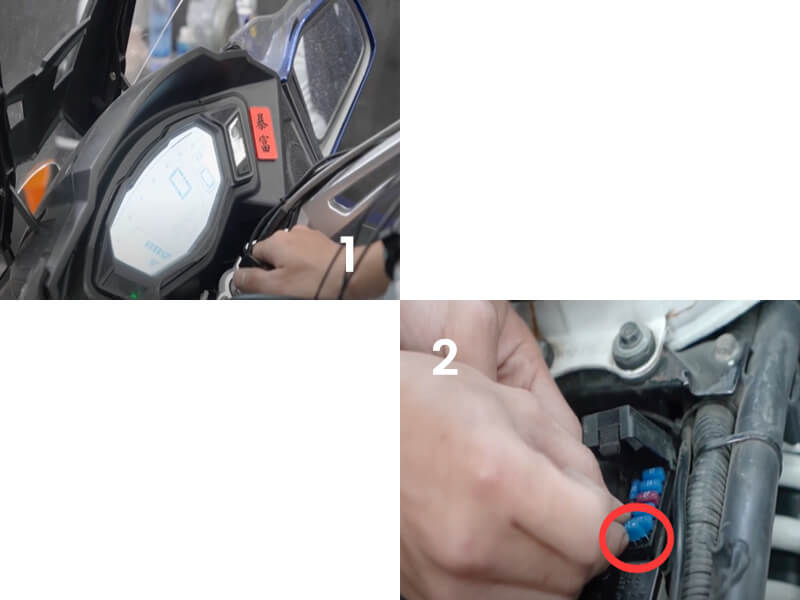
The next step is to install the wireless remote control. Take out the L shape stainless steel braket,there are 2 pcs, choose one you prefer. First, screw the L shape stainless steel braket with the remote control, see below pic.1. Second, use the L shape stainless steel braket combine the remote control to screw to the motorcycle handle, see below pic 2. Pay attention to adjusting the installation Angle of the wireless remote control. Make sure the bracket is stable and won't loosen or move during riding.
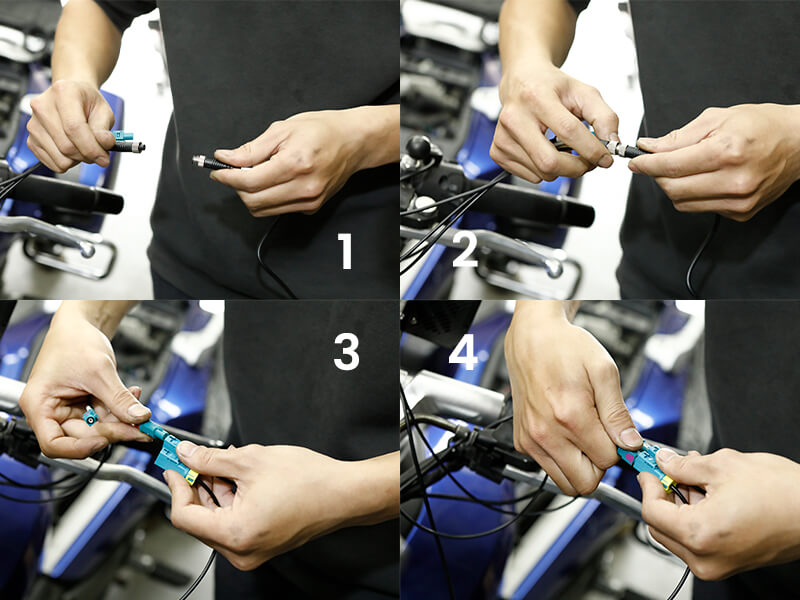
Next, let us connect the power cord (black to black) to the display unit, see the below pic 1.2. note that we connect the terminal in rotating and tightening the metal cap.Then connect front cameras and rear camera( blue terminal to blue terminal), see the below pic 3.4
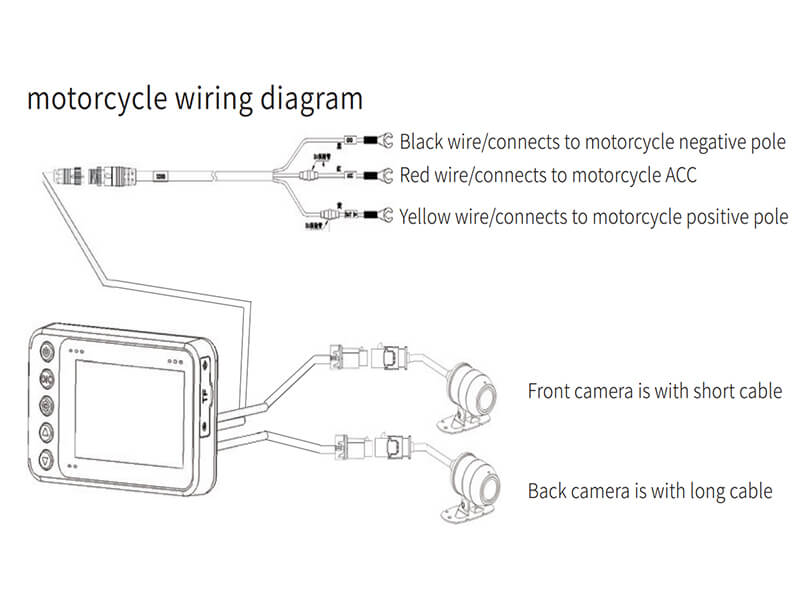
This is the wiring schematic diagram of M3500 connected to the power supply.
----Black wire/connects to motorcycle negative pole.
----Red wire/connects to motorcycle ACC.
----Yellow wire/connects to motorcycle positive pole.
Connect to the Storage Battery to get Power
The standard boxing contain hardwring power cable, take out this cable, now we are going to connect the positive and negative poles of the power supply.Yellow cable connected to the positive pole of the battery, black cable connected to the negative pole of the battery.
And the positive and negative electrodes have been marked on the battery,you can identify + is Positive pole, "-" negative pole. Like the pictures below.
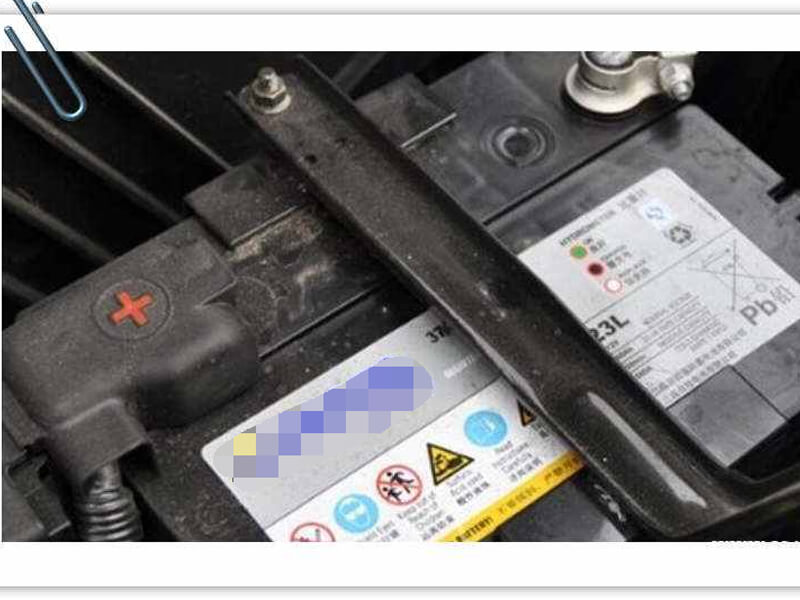
Starting wiring now, yellow cable connected to the positive pole of the battery. Black cable connected to the negative pole of the battery.

Connect to the ACC
How to identify ACC?
Consult the Owner's Manual: The owner's manual for your motorcycle often contains a fuse box diagram, indicating the purpose of each fuse and its corresponding slot in the fuse box.
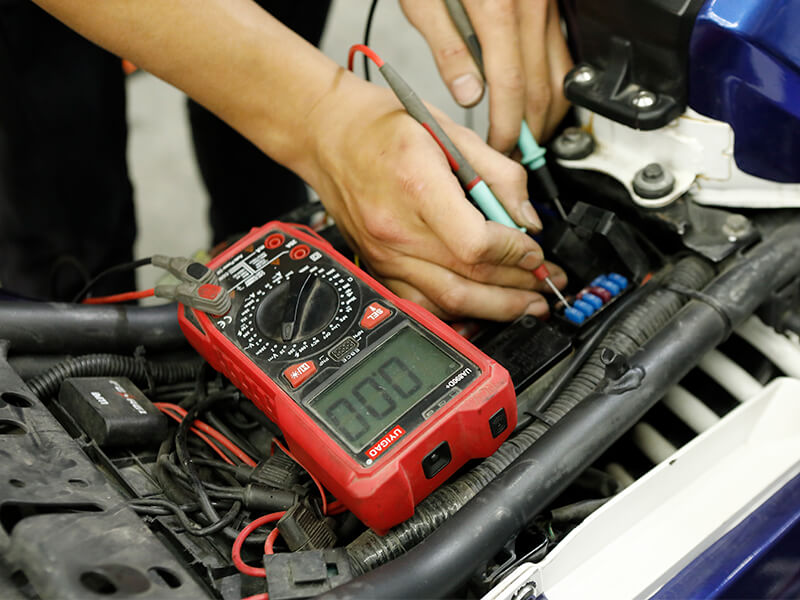
Use a multimeter to test the fuse voltage: If you have a circuit tester or multimeter, you can use it to identify the ACC fuse slot. Adjust the multimeter to the voltage measurement gear. Then open the motorcycle fuse box cover and measure the ACC. Now we test the engine off status, no voltage.
Remenber this slot you just test, now we switch on the motorcycle engine, we use multimeter to test that slot again, there has voltage.
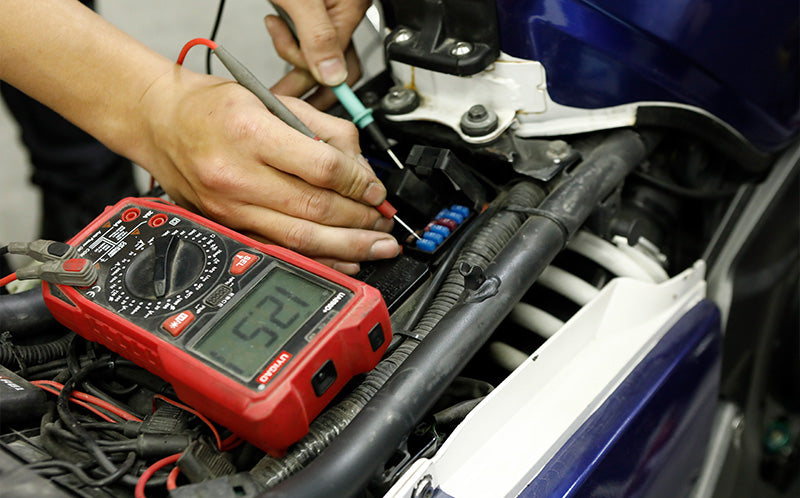
So, we can learn when the motorcycle engine is started, ACC voltage is over 14V. The motorcycle engine is off, ACC voltage turn to zero. If the above conditions are fit, then this is ACC. After we find the ACC solt,use the hardwire cable to insert the ACC tape into it, after finish inserting, close the fuse cover.
Once you've confirmed that the recorder is working properly, secure the wiring and any loose ends to prevent them from coming into contact with hot or moving parts. Finally, sort out all the cables and make them clear. Don't forget to peel off the all lenses and screen film to promise clarity at the time of the shooting.
Now Mercylion M3500 motorcycle installation is finished.
First turn on the Bluetooth remote control, then enter Bluetooth pairing from the display unit. Settings menu, press the up or down button to select start pairing, the paired device will be displayed. If no pairing is performed, the matching is being performed. If the pairing is successful, the matching is successful. If pairing fails, the connection timeout will be displayed. Please reconnect (please press the above operation again).Note: if you want to connect another Bluetooth. Please select Delete device in Bluetooth pairing (turn off Bluetooth remote control when deleting device).
Bluetooth Remote Control Sleep Mode: Every time you restart, the Bluetooth remote control is in sleep mode and you need to press the button on the Bluetooth remote control to trigger the signal and wake up Bluetooth. Therefore, every time you turn on the device, you only need to press the Bluetooth button (any button is fine).
This Mercylion M3500 has WiFi interconnection function, smart phones, tablet computers and other terminal devices can watch/control the riding recorder through WiFi. WiFi is turned on After the machine is powered on, the WiFi is turned on by itself; after turning on the WiFi, the driving recorder will act as a WiFi hotspot, the default. WiFi name is M3500-****, and the password is 12345678.
Scan the QR code in the manual to download the MERCYLION mobile APP, or search for "MERCYLION" in App Store to download it. After the machine is powered on, the WiFi is turned on by itself; After connecting to the device’s WiFi hotspot, enter the APP and click to connect to the recorder to enter the WIFI direct connection interface. The mobile phone can perform real-time image preview, device settings, video and photo preview, download and delete operations on the recorder through the app. You can check how to connect the motorcycle dashcam wifi app here.
Final thoughts:
Installing a dashcam on a motorcycle is a prudent decision that offers numerous benefits for riders in terms of safety, security, and accountability. By capturing real-time footage of the road ahead and behind, a motorbike camera system provides invaluable evidence in the event of accidents, disputes, or incidents, helping riders protect themselves legally and financially. Additionally, dashcams can serve as a deterrent to reckless driving behaviors and potential theft, enhancing overall road safety.
The installation process involves careful consideration of mounting locations, power sources, and wiring to ensure the dashcam is securely attached and functions effectively without interfering with the motorcycle's operation. By following manufacturer instructions and best practices, riders can successfully install a dashcam that meets their needs and enhances their riding experience.
Overall, investing in a motorcycle dashcam is a proactive measure that promotes safety, accountability, and peace of mind for riders, allowing them to enjoy the open road with added confidence and security. But picking the perfect motorbike dashcam and the best budget motorcycle dash cam from various options can be hard for you. It should be considered from various aspects, according to individual needs. Like the sharpness of a dashcam shot, the waterproof function, and so on. The M3500 dashcam is a very popular one with is built-in 5G Wifi Download, full body IP68 waterproof, built-in GPS and BDS, wireless Bluetooth controller, easy to install and remove.You won't be disappointed with your decision to choose it.
This article mainly introduces the M3500 installation process, if you still don't get inspiration from it, the following video is a detailed tutorial on installation
Before pairing, you need to install the tire pressure sensors on the tire valve stems first.
Next, implement pairing by operating the display unit
Press the OK button to pause the recording so you can enter the display setting interface
Enter the settings menu➬Switch to system settings➬ Find tirespressure menu➬ Press the OK key to enter
The current interface display is matching.
The tire pressure sensors will automatically match the display unit
After finishing matching you can see the tire reading changes
Q2. What Can I Do If I Can't See the Tire Reading Changes?
The reading of tire pressure change only happens when the motorcycle tire pressure change
You can ride the motorcycle for a while or treading the tires, watching the display unit tire pressure matching interface at the same tim, you will see the reading change
Return to the main interface by press the settings button
Yes, the M3500 motorbike DVR tire pressure unit support to setting as Bar or PSI, after install the tire pressure sensor on both wheels, then setting match on the dsiplay unit, you can set the tire pressure unit as PSI, more instruction see the video below
Do you see this flashing red dot? It means the machine is recording. Operate the setting need to press the OK button to pause the recording, then press the setting Button, you can enter the setting interface.

The wifi icon looks like this means the motorcycle dashcam wifi is turn off, so you can't connect to the wifi app, you need to turn it on. Enter the display unit system page, and you can set the wifi function on.


